
In my experience, the most delicious “recipes” are the most simple. Simple ingredients that don’t mask the taste of the main product and most importantly, focusing on good technique. This is one of those “recipes”. This is less of a rib roast recipe and more of a “don’t screw up this expensive and delicious hunk of meat” technique. Most often called a standing rib roast, this cut of meat comes from the rib (no kidding) primal cut or section of the cow. “Prime” may come from the fact that the ribs 9 through 12 are closest to the loin, and is also called the “First Cut”. The “standing” part comes from the fact that most people cook it “standing” on the ribs. So basically it is a prime rib, heavy on the ribs.
Now that I have my new Weber Summit, my favorite method for cooking large hunks of meat is on the rotisserie. The rotisserie is pretty forgiving, due to the slow roasting method. As long as you keep the meat spinning and check the temperatures closely toward the end, you’ll be fine. Ovens tend to cook a roast unevenly and also have a tendency to dry out the roast if you aren’t careful. The high, direct heat of a rotisserie fire also creates this amazing, caramelized crust on the outside of the rib roast that you just don’t get from the oven. Convinced yet? Can’t you just smell it by now? I can, so let’s get to roasting!
Rib Roast Recipe
Ingredients
- 1 Standing rib roast
- Kosher Salt
- Ground black pepper
- Fresh rosemary optional
Instructions
- It has been debated many times on the Internet, whether to let the meat warm up on the counter prior to cooking or not. We are dealing with a large cut of meat that I want to cook evenly, so I do let it warm up a little on the counter. Take the rib out of the refrigerator, unwrap and place on a platter on the kitchen counter about 45 minutes prior to cooking.
- Rub the rib roast with a generous amount of Kosher salt and fresh ground black pepper. I have a ton of fresh rosemary in the garden, so I tend to use that as well, but it is optional.
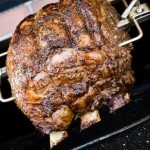
- Now for the hardware. Spear the rib roast in the middle with your rotisserie shaft and run it through to the middle of the shaft and then make sure to secure it with the additional hardware. Take a look at the picture above, I think it is self-explanatory.
- Light your rotisserie or grill burners, according to the directions for your specific grill.
- Place a pan under the rib roast to catch the drippings and get the meat spinning!
- Now this is where it gets hard to predict. All grills and rotisserie set ups are different, so it is impossible to predict timing. Start checking the temperature at the center of the rib roast (don't touch the bones) with a good, instant-read thermometer about an hour into grilling your standing rib roast. My favorite thermometer is the Thermapen
, instant, waterproof, fool-proof!
- Once the temperature starts to read around 110 degrees, it will begin to rise pretty quickly after that, so keep checking every 20 minutes just to make sure.
- Remove the rib roast from the grill 5 degrees shy of your target temperature. I like ours around medium-rare which is around 135 degrees, so I try to remove it when my thermometer is showing 130 degrees at the center. Be careful when you are removing the rib roast from the actual rotisserie shaft. The bones will probably come off pretty easily, which is fine, just make sure you don't try to use them for leverage.
- Allow the rib roast to rest for at least 20 minutes so that we don't lose all of those delicious juices.
- If you are lucky, the bones should come off with little trouble, making it easier to carve your delicious rotisserie rib roast. If the bones don't fall off easily, just cut right along the bones with a long, sharp knife to remove the ribs.
- Carve your rib roast in about 1/2 inch thick slices and serve!
This is the best. Love chewing on the bones too.